

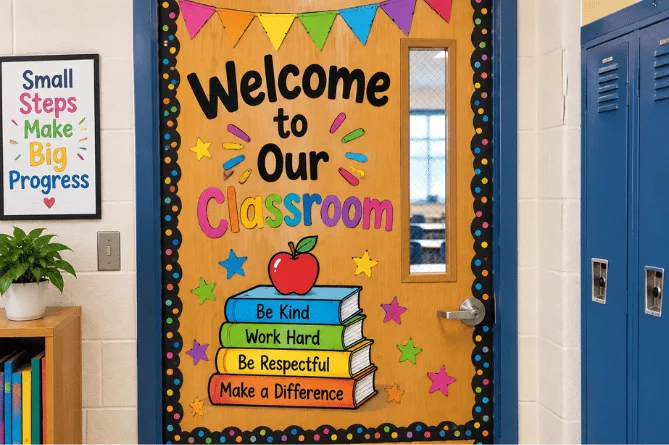
Classroom door decorations can welcome students, reinforce class identity, and make a hallway feel more inviting. The strongest designs don’t require expensive supplies or hours of cutting. A simple background, readable message, and student-made details can create a memorable entrance.
Quick answer: Good classroom doors combine one clear theme, large lettering, simple colors, and lightweight decorations. Teachers can use student names, seasonal shapes, books, learning goals, or class projects. Before attaching anything, check school rules for fire safety, door windows, adhesives, and required visibility.
| Planning question | Practical choice |
|---|---|
| Best starting material | Bulletin board or butcher paper |
| Easy year-round theme | Rainbow, books, growth, or class community |
| Low-cost supplies | Paper, cardstock, removable tape, printed letters |
| Student involvement | Names, goals, drawings, writing, or paper crafts |
| Fast seasonal update | Keep the background and replace accent pieces. |
| Important first check | School fire and door-decoration rules |
15 Classroom Door Decorations for Different Grades and Seasons

You don’t need to rebuild a door every month. Start with a reusable background and border, then change smaller pieces during the year. This approach saves preparation time while keeping the display fresh.
1. Create a “Welcome to Our Class” Door
A welcome theme works from the first school day through spring. Choose two or three colors and place a large greeting near eye level. Add each student’s name on stars, pencils, circles, or another simple shape.
Students can decorate their own name pieces during the first week. That turns classroom setup into a small community activity. It also gives every child a visible place in the display.
2. Make a “Watch Us Grow” Garden
Create a garden with paper flowers, leaves, stems, and a simple sky background. Put one student’s name in each flower or let children design their own petals. The same display can work for spring or remain up throughout the year.
You can also connect the garden to classroom goals. Students might write a skill they want to develop on one leaf. Later, they can add another leaf showing something they learned.
3. Build a Book-Themed Reading Door
A reading door works especially well for elementary classrooms, libraries, and English classes. Make colorful paper book spines and let students add favorite titles. A large open-book shape can become the center of the display.
Change several book recommendations each month instead of rebuilding everything. Students can contribute short recommendations as they finish books. The entrance then becomes a small, changing reading display.
4. Design an “Our Class Is a Team” Sports Door
Use paper jerseys, pennants, basketballs, soccer balls, or your school’s colors. Give every student a jersey or pennant containing their name. Keep the main message focused on teamwork rather than competition.
The theme also fits classroom routines built around cooperation. Pair it with clear group expectations and purposeful activities. Thinkomics’ instructional strategies for teachers can help you connect those activities with everyday learning goals.
5. Try an Outer-Space Theme
Start with black or dark-blue paper and add planets, stars, rockets, and astronauts. Messages such as “Reach for the Stars” fit many grade levels. Student names can appear on individual stars or small rockets.
Older students can make the design more academic. Each planet might contain a goal, vocabulary term, or class achievement. This keeps the theme playful without making it feel too young.
6. Create a Student Art Gallery
Turn the entrance into a rotating gallery rather than a permanent craft project. Use designated paper frames or display areas for student drawings and small projects. Rotate the work so different students receive space during the semester.
A rotating display also reduces pressure to invent new themes. The students provide much of the changing visual content. Teachers only need a durable background, title, and display system.
7. Make an Interactive Question Door
Post a weekly question and provide a safe place for student responses. Prompts might ask about favorite books, learning goals, predictions, or lesson topics. Responses can use sticky notes if your school’s rules permit them.
Questions can also become quick checks for understanding. Keep academic prompts specific enough to produce useful answers. Thinkomics’ formative assessment examples can provide more ideas for short classroom checks and student responses.
8. Use a Rainbow or Color Theme
Rainbow designs work across seasons and need few specialized materials. Cut broad paper arches or use separate colored shapes around a central message. A neutral background can keep the final result from looking crowded.
Student names can appear on clouds, raindrops, crayons, or colored circles. You can reuse the same pieces for bulletin boards later. This makes the design useful beyond the first display.
9. Make a Fall Leaves Door
A fall display can use red, orange, yellow, and brown paper leaves. Place student names, goals, or gratitude notes on individual leaves. A paper tree trunk creates a strong focal point without complicated construction.
Keep the wording broad if you want the display to last several months. A learning or growth theme can work from September through November. You only need to replace damaged leaves during that period.
10. Build a Winter Display Without a Holiday Theme
Snowflakes, mittens, penguins, and snowy landscapes can create a seasonal display without focusing on one celebration. Use white and blue paper for a simple base. Students can design individual snowflakes or winter characters.
This option may suit classrooms serving families with different traditions. Teachers can still acknowledge specific holidays elsewhere when appropriate. The door itself remains centered on winter and classroom community.
11. Create a Kindness Door
Give each student a paper heart, handprint, speech bubble, or puzzle piece. Ask them to write one practical example of kindness. Combine the pieces around a short message about respect or belonging.
The display works better when the statements describe actions. “Invite someone to join” is clearer than a general word such as “nice.” Students can add new examples as classroom situations arise.
12. Turn the Door Into a Class Goal Board
Decoration can serve a practical classroom purpose. Create sections for class goals, current achievements, and the next target. Use large text so students can understand the display without crowding around it.
Goals should remain specific and observable. For example, a class might track completed reading challenges or collaborative projects. Avoid displaying individual performance data where other students can see it.
13. Make a Student Choice Door
Give students several theme options and let them help choose the final design. They might select colors, messages, shapes, or student-created artwork. The teacher can keep control of materials and safety requirements.
Structured choice gives students ownership without turning the project into an open-ended decorating session. Thinkomics’ choice board guide offers another way to organize meaningful student choices. The same principle can help you divide door-design options into manageable tasks.
14. Create a Subject-Themed Door
Connect the display directly to what you teach. A science teacher might use planets, cells, or laboratory icons. A math classroom could feature patterns, shapes, graphs, or student-created number puzzles.
Subject themes can change with major units. Keep the permanent background simple and replace only the centerpieces. This creates variety without requiring a new door every few weeks.
15. Build a Student-Made Door From Scratch
Give groups responsibility for separate pieces of one planned design. One group can make lettering while another creates borders or illustrations. The teacher can assemble the finished pieces after checking their size and placement.
Set limits before students begin. Specify available colors, dimensions, materials, and the main message. Those boundaries make the finished design easier to assemble and visually clearer.
How to Decorate a Classroom Door Without Spending Hours
Start by measuring the usable space and checking which parts must remain uncovered. Sketch the basic layout on paper before cutting materials. A quick plan prevents oversized letters and crowded designs.
Choose a background that can stay for several months. Add a reusable border and large letters next. Treat seasonal images and student work as replaceable layers rather than rebuilding the whole display.
Prepare reusable pieces when time allows. Laminated letters, name cards, and basic shapes can return next year. Store each set in a labeled envelope or folder after removing it.
Simple Supplies to Keep in Your Classroom
Most displays can be created from ordinary school craft materials. You don’t need a large collection of themed decorations. A small reusable supply kit can handle many ideas.
Useful basics include the following.
- Bulletin board or butcher paper
- Construction paper and cardstock
- Large reusable letters
- Scissors
- Removable tape or approved adhesive
- Markers
- Printed student-name cards
- Reusable borders
- Paper shapes for seasonal changes
- Storage folders for reusable pieces
Buy specialized materials only after choosing the design. Reusing bulletin board pieces can also reduce spending. Teachers can often adapt existing classroom materials instead of purchasing a complete door kit.
Let Students Help With the Display
Student participation can make a simple design feel personal. Children can create name cards, drawings, book recommendations, goals, or themed paper shapes. Their work becomes part of the classroom environment instead of another teacher-only decoration.
Keep the task manageable by giving students a template or defined space. Open-ended crafts can produce pieces that are difficult to arrange on one door. Clear dimensions make assembly much easier.
Give students specific responsibilities when several children are working together. One group might prepare lettering while another creates the artwork. Defined jobs can keep the activity organized and make assembly faster.
Check School Safety Rules Before Decorating
U.S. schools don’t all follow identical decoration policies. District or building rules may restrict combustible materials, door coverings, adhesives, or blocked glass panels. Check your school’s current requirements before attaching paper to an exit door.
Some districts prohibit decorations directly on classroom exit doors. Others place limits on how much material may cover doors or walls. If your door cannot be decorated, move the same design to the surrounding wall or a nearby bulletin board.
Never cover required signs, hardware, windows, or safety information without permission. Keep handles, locks, and closing mechanisms clear. A creative display should never interfere with the door’s normal operation.
How to Make Classroom Door Decorations Last Longer
Durability begins with simple shapes and flat materials. Small dangling pieces can catch on backpacks or loosen when the door opens. Larger paper pieces usually survive hallway traffic better.
Secure the edges using whatever adhesive your school approves. Store reusable pieces flat after each season. Labeling storage folders by theme can make next year’s setup much faster.
You can also create a permanent frame around the display area. Keep the background and border in place while changing the center. This system turns seasonal decorating into a short update rather than another major classroom project.
Frequently Asked Questions About Classroom Door Decorations
What are easy classroom door decorations for back to school?
Start with a solid background, large welcome letters, and student names on simple paper shapes. Rainbows, pencils, stars, books, and team themes require relatively few pieces. Student-made name cards can reduce teacher preparation while making the display personal.
How can I decorate a classroom door cheaply?
Use butcher paper, construction paper, existing bulletin board borders, and reusable letters. Let students make individual pieces instead of buying premade decorations. Save sturdy components so they can be reused during another season or school year.
What classroom door themes work all year?
Books, rainbows, growth, kindness, school spirit, and community themes adapt easily across seasons. Keep the background neutral and swap smaller accent pieces when needed. Year-round themes can save considerable preparation compared with monthly redesigns.
Should students help decorate the classroom door?
Students can help when the activity fits their age and available class time. Give them defined pieces such as flowers, stars, book covers, or name cards. Clear templates help the individual contributions form one coordinated display.
Are teachers allowed to cover classroom doors with paper?
Rules vary by school, district, building, and applicable fire requirements. Some U.S. districts restrict or prohibit combustible decorations on classroom exit doors. Always check current local rules before covering a door or its glass panel.
Choose a Door Idea You Can Maintain
The most useful classroom door decorations fit your available time, materials, students, and school rules. A clear message and student-created details can be more effective than an elaborate display. Choose a design that won’t become another weekly maintenance job.
Start with one reusable background and one flexible theme. Add student work or seasonal pieces when they support your classroom goals. A welcoming entrance can stay simple while still giving students a sense that the room belongs to them.